

How To Clean Bare Wood Before Staining
 Whether you're refinishing your floors, making a tabular array, cabinets or whatsoever other project that requires finishing, it's useful to larn how to use stain properly and brand your projects actually smooth.
Applying stain is a pretty easy process that doesn't need more than a couple sentences to explain (which I'll go into at the end of the post), but how to properly prep woods for stain is a whole other thing.
Certain woods like pino, maple and others either take a difficult time accepting stain at all or they become and then blotchy when stained that the results are a mess. To avoid that, I've tried lots of techniques over the years to help my projects take stain evenly.
We refinish a lot of wood floors, many of which are difficult woods like pino, which take a little extra piece of work to make the stain wait correct, but it'southward non as complicated every bit you might think. I'll show you lot my secrets on how to prep wood for stain right here!
How To: Sand Wood Before Staining
It all starts with sanding. You need a smooth surface with no blemishes because stain will highlight scratches and dings in the wood. Ever sand down to make clean wood (if you have enough meat left of the wood) before applying any stain.
Look out for whatsoever swirl marks from orbital sanders which may be hard to run into initially, only they will pop out like a sore thumb after you apply stain if you lot miss them.
A lot of folks make the mistake of sanding to either as well fine of a dust or non fine enough earlier applying stain. Also fine and the wood won't exist able to accept the stain. Likewise crude and the forest will exist very nighttime almost to the betoken of being blackness.
So, what's the correct grit? Mostly speaking, for forest like oak and pine, I don't like to go any finer than 120-grit or any rougher than 100-grit. Stay close to that range and the woods should await great.
My Surreptitious for Smooth Staining
Once you're done sanding, brand certain you've gotten rid of ALL the sanding grit before you do anything else. Utilise a good vacuum and so a tack rag to wipe the surface clean of any contaminants.
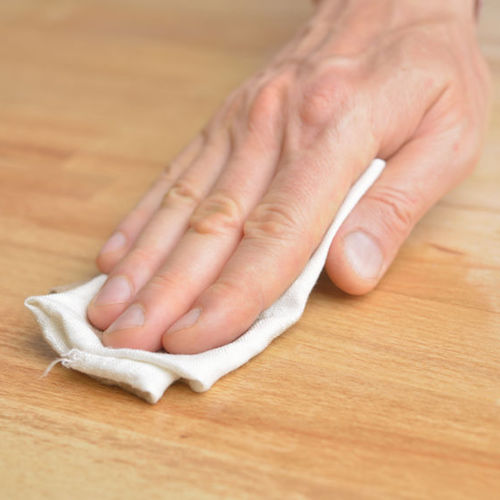
The next step is the fox hither. Wipe the surface thoroughly with a a moisture fabric. Not clammy and not dripping, merely somewhere in the eye so that every inch of the wood is wet, but with no puddles.
"Popping" the Grain
The technique of wetting the woods down before staining is chosen "popping" the grain. What it does is open up the pores of the wood to allow it to take the stain evenly and deeply.
When you h2o pop wood, you won't have to do multiple coats of stain either. The woods grain is so open up that in i coat you lot should exist able to go the expect you desire.
Even with difficult woods like pino, I have had great success in getting even stain coverage without the common blotchiness that happens so oft. If you lot are working on a pine projection that you plan to stain, this is the only way to go.
The Biggest Mistakes to Avoid
The biggest mistake I run into when water popping forest is that people either go out puddles or missed spots. When you miss areas those areas will non have the stain as securely and wait much paler, and then make ABSOLUTELY Sure that y'all hit every area equally.
Applying Stain
One time the water has completely dried, you are ready to use your stain. Don't rush this! Wait until every trace of water has evaporated before putting any stain down.
Equally for how to apply stain properly, it's pretty easy. Yous wipe it on and wipe information technology right off. Apply a generous corporeality of stain to the flooring or project and work it into the grain and and so wipe it right off. Don't go out any puddles or wet spots. Wipe it with a clean rag until the surface is relatively smoothen.
If you lot do find you demand a darker color, wait until everything has dried and then go dorsum with some other coat. Stale stain on wood should exit very minimal color rub off on a rag or socks if at all. That'south how you know it'southward ready for finishing.
Make sure when you are applying stain that you accept plenty of lint complimentary rags like onetime cotton shirts. Yous don't want to run out halfway through and accept nothing to wipe off your excess stain.
That's the whole enchilada when it comes to stain as far as I'grand concerned. Stain is a great mode to make creative projects. You lot can mix and lucifer equally many different colors as you want to make your own custom colors. Just make sure y'all keep water-based stains with h2o and oil-based stains with oil. I personally adopt oil-based stain.
What about wood conditioner?
I'm sure some folks will enquire this and for them I'd say that forest conditioner works much the same way equally h2o except that you pay a whole bunch of coin for something that just as hands could have come up out of the tap for pennies.
Save your money for the big projects and don't waste it on wood conditioner. And that'due south my two cents.
Subscribe Now For Your FREE eBook!

Founder & Editor-in-Principal
I love onetime houses, working with my hands, and teaching others the excitment of doing it yourself! Everything is teachable if you only give it the chance.

Source: https://thecraftsmanblog.com/how-to-prep-wood-for-stain/
Posted by: elmorethrodgent.blogspot.com
0 Response to "How To Clean Bare Wood Before Staining"
Post a Comment